


I have made my first ever chrome extension this week. I always wonder how chrome extension works - some extensions make our life easy by doing some specific task. This curiosity in me always drive me to do something - create something. This adrenaline drove me to build my first ever chrome extensions. I am sharing my experience and my pov to create this, I hope this blog post will inspire you to do something on your own. So let's get started😍
Step 1: Creating the environment
At first go to your code editor and create a JSON file named manifest.json. This is a metadata file in JSON format that has all the information that the extension has. Like the name of the extension, description, all the permission it requires to run on the browser. It looks something like this:
{

   "name": "Mood Fresh",
    "version": "1.0.0",
    "author": "Ishan",
    "manifest_version": 2,
    "description": "This extension will help you light your mood when you get exhausted by browsing",

    "browser_action": {

        "default_popup": "popup.html",
        "default_icon": "icon.png"

 },

    "icons": {

        "64": "icon.png"

 },

    "permissions": ["activeTab"]

}
As you can see the the manifest version in it is 2 as chrome use this version of manifest.json
In the browser action default popup is popup.html. This is the HTML file that will be called every time the extension got clicked and to display this over the current tab we using, we have to give permission to control the active tab. Put a icon you like in the extension and set the size(For me its 64X64 and God suggest me some cool names 😂😂).
Step 2: Create your HTML file
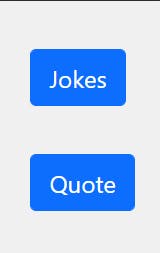
Now create a file named popup.html and write some html in it to display its functionality. (For me I am creating a random joke and quote extension)
Link your css and js file with it ( I am using Bootstarp button )
 <button  type="button" class="btn btn-primary my-3 mx-2 jokes">Jokes</button>

    <button type="button" class="btn btn-primary my-3 mx-2 quote">Quote</button>

    <h3 id="text"></h3>
Step 3: Create your js file
Next in your js file select the element using DOM.
const jokeCall=document.querySelector(".jokes");

const newsCall = document.querySelector(".news");

const quoteCall = document.querySelector(".quote");

const setText = document.querySelector("#text");
I am using joke and quote API to fetch JSON data
const jokeApi = "https://icanhazdadjoke.com/slack";

const quoteApi = "https://api.quotable.io/random";
Now I am calling the API every time the buttons got clicked and fetching the JSON file using fetch api If you don't know how fetch api works, don't worry, just give a short tour to the MDN Docs After calling the API I am changing the text of the h3 element by changing it's innerHTML I am not styling it - if you want do that.
quoteCall.addEventListener("click", () =>{
   fetch(quoteApi)
   .then( data => data.json())
   .then(jokes =>{

    const joke = jokes.content ;

    setText.innerHTML = joke;

   })

})

jokeCall.addEventListener("click", () =>{

    fetch(jokeApi)
    .then( data => data.json())
     .then(jokes => {

      const newJoke = jokes.attachments[0].text;

      setText.innerHTML = newJoke;


     });


})
Hurrah 🎉🎉 We have just created our first extension. Now its time to test it on chrome.
Step 4: Testing on Chrome
Now in Chrome open extension tab and on the Developer mode

Now click on the Load Unpacked button and choose your extension directory. Pin it in the tab and click the respective button to get new joke and quote.
This will look exactly like this
.
That's all for this day guys. I hope you like the article about publishing your first ever extension. I am not publishing it on Chrome Web Store. If you want that go to Chrome Web Store Pay the registration fee and add your item in ZIP file.
If you find this article helpful like it to motivate me xd. Follow me on Twitter and DM me your experience. Don’t forget to share your project in the comments and hit the like button if this article was any useful to you.
Got questions or feedback? Let me know in the comments!
Till that will meet you all in the next blog. Be happy , be positve.